Monday, August 30, 2010

My Fair Ladies

I've been wanting to have the chance to spend some time in the clean craft room but the new job and house work has kept me busy. I managed to get up super early yesterday and drag out a few supplies and start on a heritage album:


I spent most of my time sitting there "thinking" about what to do and not really doing! (Don't you ahet that?) But at least I got some creative time in. I also remembered that I haven't shared the latest Victorian Lady I finished up a few weeks ago and quickly snapped some pictures:


It really is much cuter then this photo lets on! I used a fan ornament I found at the thrift store, some vintage photos I printed from here and some great silver leaves that Shara sent me some time ago. I actually started it back when I made this ornament I made two years ago:


You can see the original post here. Oh yes, TWO YEARS it's been sitting in pieces waiting to be finished. Oh how I procrastinate lol. However, I'm glad the pair is done! I think they are so cute and I keep them in little shadow boxes I found on clearance forever ago:


Cute, right? So as you can imagine I put the heritage album stuff away and drug out my files of Victorian ladies and started on some Halloween witches. Hopefully they will be finished by October 2012. ;) I'll share those soon! Has any one else started on fall crafts yet?

Please stop by and read my latest article on refinishing flea market furniture. I have an expert guest who gives great tips on stripping off and repainting the pieces. This is the first post where I feature that expert who happens to be my dad! So please visit and see what he has to say. You won't be sorry! :)

Tuesday, August 24, 2010

Kokeshi

I love collecting things. It adds to the "thrill of the hunt." I have many little collections that I've shared here but I don't think I've ever showed my small collection of Kokeshi dolls:


The two in the center are thrift store finds. The tall one on the left is from a "junk" antique store (and I say that fondly!) and it's really a set of three nesting dolls. The big fella on the right was a gift from my friend Nina when she recently visited Japan. He is new, as opposed to the vintage ones, and a bit bigger. I think the four of them might a lovely team and I hope to find more in my travels.

Nina also brought me other fun goodies from her trip like little silk squares and those adorable tiny erasers! It was like Christmas. :)

If you really want to see some amazing collections visit Laurie at Magpie Ethel. She does a a collection challenge each week and you can see them all here. Prepare to be amazed! Maybe we can convince Laurie to host a collection blog party where everyone can post their collections for sharing.

While you're out there on the world wide web please stop by HERE and see my new Examiner page. I would love it if you subscribed to receive my arts and crafts articles. You'll see many of my favorite bloggers and new friends featured plus fun and affordable craft projects to try. The first national article is posted there and is about using paint to freshen up flea market furniture. You can read it HERE. Thank you again for all of your support! Ideas for articles and projects are always welcome. And if you have discovered any fantastic new crafting and DIY blogs out there please let me know!

Fondly ~ Rebecca

Sunday, August 22, 2010

Putting the Goodness back in Thrifting

Pickings have been slim in the thrifts around here lately. Most trips result in nothing exciting and are hardly worth the gas money. Today I decided to take a drive out to one of the bigger stores and was finally glad I made the trip!

This was my very first find in the door:


Did you see the article in the current issue of Country Living about the State Souvenir glasses? This one is different from the one they featured from Vermont but I think it's cuter! And now, of course, I'll be searching for more. 1 down, 49 to go! lol


I LOVE Salty and Peppy. I promised myself I wouldn't buy salt and pepper shakers as I just donated a bunch but COME ON. Could you have left them behind? And that guy on the left? I'd love to find his mate. I looked all over the store but no luck. Hopefully she'll turn up in time. (Do you think of salt as female and pepper as male or is it just me? ha!)


Someone donated a huge amount of fabric scraps as there were piles to go through. Most were patterns I didn't love and as I already have that giant load of fabric brewing I figured I shouldn't add to it too much. The pieces for 99 cents and about a yard each. I scooped up these four pieces. Loving those pink and blue damask designs.


And one Shabby Chic pillow sham. (awful photo!) Again, I wish it were a pair but perhaps it, too, will appear in a future trip.

So now everyone do the thrifty karma dance so I may reunite my shaker and sham! :) It's nice to finally find some things that I couldn't wait to inspect when I got home.

Saturday, August 21, 2010

Ready for Autumn

I'm so over summer. I hate the hot. Oh and the bugs, too. Don't get me wrong. I love the beach and swimming in the ocean but I'm ready for the cool, crisp fall air, the cold weather fashions and all the crafting and fun that comes along with the big holidays.

I finished my first week at my new job and I'm exhausted! It's hard to get back into the routine of working 40 plus hours a week and still being able to get everything else done. I'm sure I'll acclimate soon though. :)

In other news, I am now the official Arts & Crafts writer for the National Edition of the Examiner! My previous articles were featured on the New York local page while my new articles will appear on the national page. My page will be available HERE but it is currently not publishing. Hopefully it will be up soon and I'll be able to get started! I'm looking to highlight crafters across the country plus online shops, products and tools. I also plan to continue the trash to treasure and budget crafting themes as well as DIY home projects. I'll be visiting your blogs and contacting you about being featured! I'm hoping to create a nationwide network of crafters who share ideas, inspiration and info. The only thing I'll need from you is permission to link to your site and use your photos which will be credited to you. And if you could link to the article and help drive readership that would be great! The more readers, the more sponsors and the more opportunities to have some fabulous give aways.

Now back to Autumnal dreaming . . .


Arthur is ready for Halloween!


He has donned his super suit and can't wait to hit the streets.


I created him based on pictures in "Arthur's Halloween" which I found at the thrift.


His cuteness is ridiculous. :) He's renewed my love of toy making and I expect to make him a few friends soon. Perhaps another character from the same book? If you have any suggestions for softies that can be based on childrens book pictures/characters, let me know!

Oh and a giveaway is coming soon. More fun Martha Stewart Crafts items! Toodles!

Sunday, August 15, 2010

Craft Room Reorganization

I'm sure you've heard this before. "I'm going to work on cleaning up the craft room." Um yeah. I know. I say it often but do it infrequently. But this time, I delivered.


I. KNOW. I can actually WORK in there. Who would have thought?


I've added a few new pieces like the two tiered basket above and some paper storage cubes I picked up at Michaels this weekend. I took the photos before I put them together but they make it even nicer.


One of the problems with this room is that there is no closet so everything has to be out.


Trying to keep everything neat is also an issue for me. Why? Because I tend to drag out everything and then figure I'll put it away later.


Plus I love displaying not only my creations but those I've received from others. I'll be doing a post soon on my favorite treasures but you can see a few of them in the photos if you look carefully.


There are still problem areas like this fabric pile. I swear it grows on it's own like Gremlins. Sigh . . .

So now the challenge is to keep it nice and neat. I actually did some scrap booking yesterday and YES the paper and other supplies are still out on the desk but I promise I'll put them away later. No, really.

My first day at my new job is tomorrow. I'm nervous and excited and dreading it. Oy. Wish me luck!

Tuesday, August 10, 2010

Buddy Bear Pattern

Here is a sweet crocheted bear pattern for sharing. Skills needed are single crochet, crocheting in the rouad, increases and decreases. It's fairly easy and you can pretty much use any yarn that you like. I used a light worsted/sport on the pink and yellow bears and worsted weight on the brown bear which came out slightly larger. The pattern is written for a striped bear but feel free to use two colors to achieve a more traditional looking Buddy Bear. Enjoy and let me know if you make one!! I've posted this on Ravelry so welcome new friends!

Buddy Bears*


Materials:
1 - 2 skeins of worsted weight yarn or 2 - 3 skeins of acrylic/cotton blend yarn (sport weight)
size H hook (for worsted weight yarn) or size G (for sport weight yarn)
stitch marker or safety pin
Buttons
stuffing (Polyfil)
yarn needle

Gauge:
gauge is not essential to this pattern. Just be sure to match the correct hook size to the
weight of yarn that you choose.

Abbreviations:
sc - single crochet
sc2tog - single crochet 2 together (decrease)
m/r - magic ring

Notes:
If you are unsure how to start off with a magic ring just chain two and create the appropriate
number of stitches in the first chain instead.

Remember to use your stitch marker to keep your count correct.
You will not be joining at the end of the rows, you will be crocheting in a spiral.

The number at the end of the row instructions are the number of stitches you should have after each
completed row.

Stuff your bear fully so he's not too floppy. If you think it's not enough stuffing it probably
isn't :P

The color changes listed in the pattern below are for a bear wearing a t-shirt, socks and
mittens. The colors are just an example and you can use whatever color combos you like
and can add stripes on the body, arms and legs as you wish. You can also do everything in
one color as well.

COLOR A - Pink
COLOR B - White
COLOR C - Light Brown
Color D - Yellow

Head & Body:

With color A -
6 sc into m/r (see note) - place marker in last stitch and move with each round so as not to
lose count - DO NOT JOIN
2 sc into each stitch (12)
(1 sc in first stitch, 2 sc into next stitch) repeat around (18)
(1 sc in first 2 stitches, 2 sc into next stitch) repeat around (24)
(1 sc in first 3 stitches, 2 sc into next stitch) repeat around (30)
(1 sc in first 4 stitches, 2 sc into next stitch) repeat around (36)
(1 sc in first 5 stitches, 2 sc into next stitch) repeat around (42)
(1 sc in first 6 stitches, 2 sc into next stitch) repeat around (48)
(1 sc in first 7 stitches, 2 sc into next stitch) repeat around (54)
(1 sc in first 8 stitches, 2 sc into next stitch) repeat around (60)
1 sc in each stitch around for 12 rounds (60)
(1 sc in first 8 stitches, sc2tog) repeat around (54)
(1 sc in first 7 stitches, sc2tog) repeat around (48)
(1 sc in first 6 stitches, sc2tog) repeat around (42)
(1 sc in first 5 stitches, sc2tog) repeat around (36)
(1 sc in first 4 stitches, sc2tog) repeat around (30)
(1 sc in first 3 stitches, sc2tog) repeat around (24)
Change to color B -
1 sc in each stitch around for 3 rounds (24)

STUFF HEAD

Change to color C -
1 sc in each stitch around for 1 round (24)
(1 sc in first 3 stitches, 2 sc into next stitch) repeat around (30)
(1 sc in first 4 stitches, 2 sc into next stitch) repeat around (36)
1 sc in each stitch around for 5 rows (36)
(1 sc in first 5 stitches, 2 sc into next stitch) repeat around (42)
1 sc in each stitch around for 2 rows (42)
Change to color B -
1 sc in each stitch around for 2 rows (42)
Change to color A -
1 sc in each stitch around for 4 rows (42)
(1 sc in first 6 stitches, 2 sc into next stitch) repeat around (48)
1 sc in each stitch around for 6 rows (48)
(1 sc in first 6 stitches, sc2tog) repeat around (42)
(1 sc in first 5 stitches, sc2tog) repeat around (36)
(1 sc in first 4 stitches, sc2tog) repeat around (30)
(1 sc in first 3 stitches, sc2tog) repeat around (24)
(1 sc in first 2 stitches, sc2tog) repeat around (18)

STUFF BODY

(1 sc in first 1 stitches, sc2tog) repeat around (12)
(sc2tog) repeat around (6)
finish off leaving a long tail (about 10 inches), Thread yarn needle onto tail and weave in and
out of remaining 6 stitches and pull tight to close up the circle. secure the thread with a knot
and bury inside of body.

Ears (make 2):

With Color A -
6 sc into m/r (see note) - place marker in last stitch and move with each round so as not to
lose count - DO NOT JOIN
2 sc into each stitch (12)
(1 sc in first stitch, 2 sc into next stitch) repeat around (18)
(1 sc in first 2 stitches, 2 sc into next stitch) repeat around (24)
(1 sc in first 3 stitches, 2 sc into next stitch) repeat around (30)
1 sc in each stitch around for 4 rows (30)
finish off leaving a long yarn tail (about 12 inches). Thread yarn needle onto tail and fold ears
in half to sew them to the head. I find it easier to place the ears if I pin them to the head
before sewing down and only locking in the yarn tail (after sewing) once both ears are on.
That way it is easier to pull out your stitches if you need to reposition the ear.

Nose:

With Color B -
same as ear instructions though do not fold in half. Place on face and stitch down, leaving a
space to stuff the nose and then closing up and locking in yarn tail.

Tail:

With Color A -
6 sc into m/r (see note) - place marker in last stitch and move with each round so as not to
lose count - DO NOT JOIN
2 sc into each stitch (12)
1 sc in each stitch around for 1 row (12)
finish off leaving a long yarn tail (about 6 inches). Thread yarn needle onto tail and sew tail
to the behind.

Legs (make 2):

With color B -
6 sc into m/r (see note) - place marker in last stitch and move with each round so as not to
lose count - DO NOT JOIN
2 sc into each stitch (12)
(1 sc in first stitch, 2 sc into next stitch) repeat around (18)
(1 sc in first 2 stitches, 2 sc into next stitch) repeat around (24)
1 sc in each stitch around for 4 rows (24)
(sc2tog, 1 sc in next 2 stitches) 4 times, 1 sc in next 8 stitches (20)
1 sc in each stitch around for 5 rows (20)
TURN (you will start working back and forth in rows to create the heel)
sc2tog, sc 1 in next 8 stitches, sc2tog TURN
sc2tog, sc 1 in next 7 stitches, sc2tog (this will connect the first decrease you made in the
last row and the stitch below it) TURN
sc2tog, sc 1 in next 6 stitches, sc2tog (this will connect the first decrease you made in the
last row and the stitch below it) TURN
sc2tog, sc 1 in next 5 stitches, sc2tog (this will connect the first decrease you made in the
last row and the stitch below it)
DO NOT TURN  (you will return to crocheting in spirals)
sc 1 in next 7 stitches, sc2tog (this will connect the last stitch before the heel ridge and the
first stitch on top of the heel ridge), sc 1 in next 6 stitches (place marker) (14)
1 sc in each stitch around for 1 row (14)
Change to color D -
1 sc in each stitch around for 10 rows (14)
Change to color C -
1 sc in each stitch around for 2 rows (14)
Change to color A -
1 sc in each stitch around for 10 rows (14)
finish off leaving a long yarn tail (about 12 inches). Stuff legs. Thread yarn needle onto yarn
tail and attach legs to bottom of body

Arms (make 2):

With color B -
6 sc into m/r (see note) - place marker in last stitch and move with each round so as not to
lose count - DO NOT JOIN
2 sc into each stitch (12)
(1 sc in first stitch, 2 sc into next stitch) repeat around (18)
1 sc in each stitch around for 4 rows (18)
(1 sc in first 1 stitches, sc2tog) repeat around (12)
1 sc in each stitch around for 1 row (12)
Change to color D -
1 sc in each stitch around for 6 rows (12)
Change to color A -
1 sc in each stitch around for 6 rows (12)
Change to color B -
1 sc in each stitch around for 2 rows (12)
Change to color C -
1 sc in each stitch around for 5 rows (12)
finish off leaving a long yarn tail (about 12 inches). Stuff arms. Thread yarn needle onto yarn
tail and attach arms to the side of the body

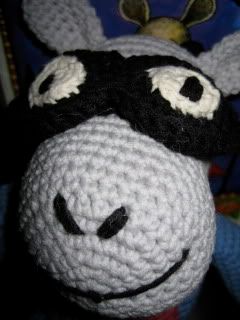
Sew on buttons for eyes, nose and belly button. Stitch on upside down "Y" for mouth.


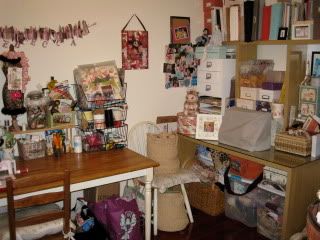
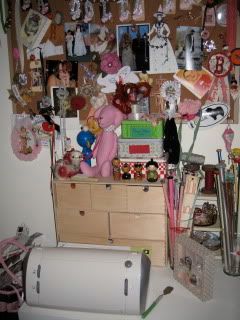
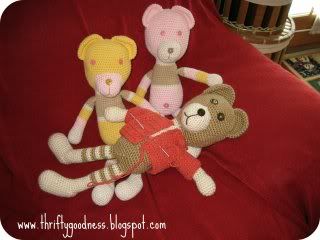
Buddy Bears make great friends. Mine are currently hanging out in the craft room.


Try mixing up all sorts of colors.


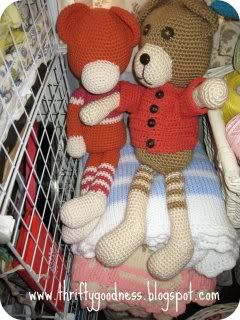
The orange one was made with 100% cotton and is a little rougher than the others but could certainly take a bit more of a beating. :) I need to give him a face! You can see here how the worsted weight yarn gives you a bigger bear.


* Buddy Bears are my personal pattern. Please feel free to use this pattern to make fun friends of your own but please give me credit for the pattern! Thanks!

Monday, August 09, 2010

Thrift Share Monday - Fabric Finds

While I haven't been too lucky in the thrifty department lately I did want to share some of the fabric finds I've scored through out the year. The post was inspired by the fabric and apron I scored last week:


I am LOVING that red, white and blue fabric. It's screaming beach bags to me for some reason. (Maybe because I only seem to make bags and toys, perhaps?) The green fabric on the right is actually an apron:


The top is a pretty patchwork and I believe this was the style that was pinned to your top as there are no neck ties. I will probably use this as fabric but I'm still on the fence.

Here are some of my past vintage fabrics finds:


This is an appliance cover much too small for any that I own. I adore this pattern!


Another apron with no strings destined to be transformed.


I love this fabric. It's a heavy almost canvas feel and there are maybe 4 yards of it. What to do, what to do?


This is very light weight and drapey. It reminds me of vacation scarves and I think I'll try making my own. I may even try doing a hand rolled hem. LOVE those red feathers!


There is a ton of this and I am not sure what I'll ever do with it. It' very gauzy and almost see through but was a steal at under $2 and I couldn't leave it behind. Any thoughts?


I found about 4 yards of this vintage madras more than a year ago. And just so you don't think I'm just sitting over here hoarding:


A fun summer bag! (are you surprised, lol?)


While I love the polka dot lining I sort of wish I had left off the pocket on the front and have been considering removing it. I think it takes away from design. What would you do?

Thanks for stopping by! I love reading your comments and ideas. :)

Thursday, August 05, 2010

Swaptastic

I'm so lucky to have such fabulous crafty friends. When I found out I wasn't going to be involved in a Vintage Vacation Swap this summer my friend Elise suggested she and I do a swap instead. I'm so glad we did!


Look how cute! I love cute packaging. I think it really makes a swap feel even more like a special gift.


I love the brooch she put on the cute straw tote. I'm sure I'll be sporting this on a coat come fall.


And inside the bag? A great knitting book and needles!


Perhaps my favorite part is this cute clothes pin dolly all ready for collecting shells on the beach.


So many goodies were tucked into the big box including vintage Aunt Martha's transfers, some cute stamps and little vintage book page birds!


She also made me a lovely pennant banner out of vintage sheeting (which you know I love) and even made a cute card with the fabric scraps!


I also love this cute shell encrusted candle holder/vase. It reminds me of Sailors Valentines. And how cute are the little scrabble seashells tiles? Along with the great jar of beach glass all of these things are already on my sun porch which is decorated in a pretty pale blue beach theme. Thanks, Elise! What a great swap. :)

Of course I forgot to take photos of what I sent her but I chose a vintage kitchen theme and included a vintage chopper with wooden handle, loads of vintage linens, some cute little heart shaped tins and other goodies. Elise just welcomed her latest addition to her family yesterday so stop by her blog and say welcome to sweet little Violet!

And please also stop by and see my latest Trash to Treasure article at the Examiner, a cute ruffled pillow made from a t-shirt and dress shirt from Tricia at Oh So Crafty!

xoxoxo ~ rr

Monday, August 02, 2010

Pink and Black Parisian Bridal Shower

My cousin Katy is getting married in December. She also is moving to San Diego to start a masters
program and will only be back in her home town for wedding planning and fun once before the big day. So her mother, my Aunt Glor, decided to throw her a surprise shower before she headed to the west coast. She got my mom and Auntie P. involved to coordinate and of course they put my sister and I to work.

Somewhere in the planning process we decided on a Parisian pink and black theme. You know I love a good color combo! The event was fabulous and the bride to be was surprised and thrilled.


One of my favorite projects is this Bon-Bon banner for the sweets table.


Mom and I collaborated on the design and had a blast using her new Cricut Expression machine.


The paper bride's crown and pins I made for the bridal party were well received.


We even got my dad in on it. He made this wishing well for a previous shower . . .


. . . and the Eiffel Tower centerpiece on the buffet table.


We, of course, included a fun candy bar . . .


. . . and decorated the shower umbrella made by my great grandmother that has been used at every shower in the family since the 60s. I also made on of my traditional banners for the bride to take home.

It was a blast creating and collaborating for this event but it was even cooler to see how much fun was had by Katy.

Want to know more and read some handy budget friendly tips on party planning? See my latest article for the Examiner HERE.

hugs ~ rebecca

LinkWithin

Related Posts with Thumbnails